CPU Monitor [1] - A bit closer to hardware
After deciding to make a CPU monitor application in C++, I thought to myself that it should be a fairly simple task involving the calling of some libraries, but a closer look at the problem revealed that this is not the case. Sure there are some libraries on the internet that offer all sorts of CPU information, but to get all the data, I decided to write my own library. This however is not so straightforward. Accessing the CPU information requires the use of assembly language, which can be embedded in the C++ code. A useful guide that helped me get started.
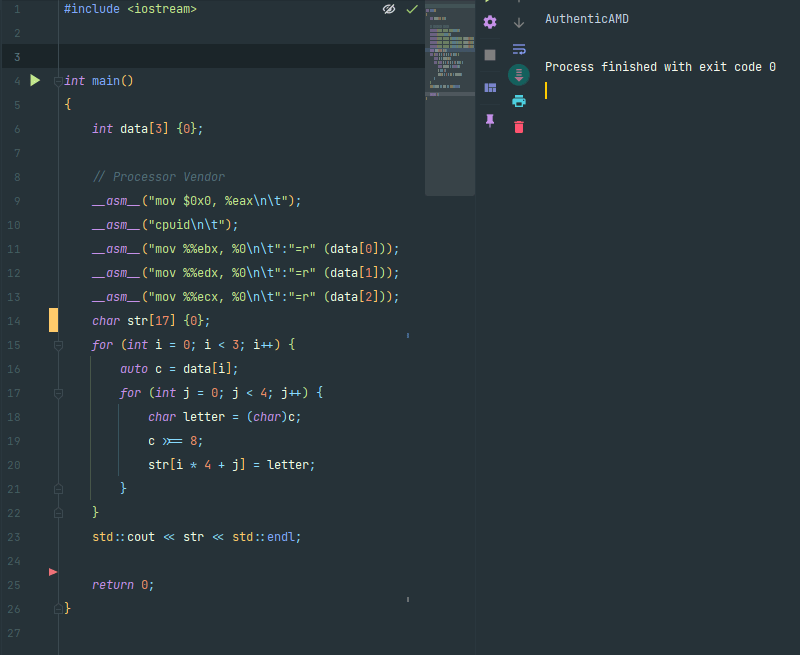
Getting all the data came down to just two instructions: mov and cpuid. The first instruction just moves data from one point to another - in this case I mainly moved values inside of the eax *register, and moved the data out of registers *eax *to *edx. These registers are used for storing data and are also used by the cpuid instruction. The second instruction is for obtaining the CPU information. Below is an example assembly/C++ code, which obtains the processor vendor’s name.
#include <iostream>

int main()
{
    int data[3] {0};

    // Processor Vendor
    __asm__("mov $0x0, %eax\n\t");
    __asm__("cpuid\n\t");
    __asm__("mov %%ebx, %0\n\t":"=r" (data[0]));
    __asm__("mov %%edx, %0\n\t":"=r" (data[1]));
    __asm__("mov %%ecx, %0\n\t":"=r" (data[2]));
    char str[17] {0}; // 17 characters, just so that the string is null terminated
    for (int i = 0; i < 3; i++) {
        auto c = data[i];
        for (int j = 0; j < 4; j++) {
            char letter = (char)c;
            c >>= 8;
            str[i * 4 + j] = letter;
        }
    }
    std::cout << str << std::endl;

    return 0;
}
Basically the code above first “saves” value 0 inside of the eax register and after that the instruction cpuid is called. The value inside of eax thus in this case represents the function that is called by the cpuid instruction. To find out what this function does, I had to look at the processor’s CPUID Specification sheet, which is available on the vendor’s site - in my case it is an AMD CPU, so I looked for and AMD CPUID Specification sheet. You can find the same sheet for Intel.
After the cpuid instruction is executed for the 0000_0000 function (that is why we saved value 0 inside of the eax register), output of that function is saved inside of the eax to edx registers. Looking at the sheet, we can see the values saved inside of the registers.

Inside of the registers are the values representing the vendor’s name (AuthenticAMD), we just have to read the values in the right order and potentially convert them to characters - which I did by shifting the values inside of the integers.
Running the program yields the following output.
By using different functions we can of course get even more data. By using the 0000_0001 instruction we can for example get information about the CPU family, model and stepping, local APIC ID, logical processor count and much more. More information about this can be found in the mentioned CPU Specification Sheets or in my repository where I am actively developing this program.
Below is an example of how to obtain the CPU family, model and stepping (mind that this code was developed for the AMD CPUs and might not work with Intel CPUs. since at least at first glance I figured there are some differences):
int main()
{
    // Family, Model, Stepping
    __asm__("mov $0x1, %eax\n\t");
    __asm__("cpuid\n\t");
    __asm__("mov %%eax, %0\n\t":"=r" (data[0]));
    __asm__("mov %%ebx, %0\n\t":"=r" (data[1]));
    __asm__("mov %%ecx, %0\n\t":"=r" (data[2]));
    __asm__("mov %%edx, %0\n\t":"=r" (data[3]));

    int stepping {0},
        baseModel {0},
        baseFamily{0},
        reserved1 {0},
        extModel {0},
        extFamily {0},
        reserved2 {0};

    stepping = data[0] & 15;
    baseModel = (data[0] >>= 4) & 15;
    baseFamily = (data[0] >>= 4) & 15;
    reserved1 = (data[0] >>= 4) & 15;
    extModel = (data[0] >>= 4) & 15;
    extFamily = (data[0] >>= 4) & 255;
    reserved2 = (data[0] >>= 8) & 15;

    std::cout << "Stepping: " << stepping << std::endl;
    std::cout << "Base Model: " << baseModel << std::endl;
    std::cout << "Base Family: " << baseFamily << std::endl;
    std::cout << "Reserved 1: " << reserved1 << std::endl;
    std::cout << "Extended Model: " << extModel << std::endl;
    std::cout << "Extended Family: " << extFamily << std::endl;
    std::cout << "Reserved 2: " << reserved2 << std::endl;
}
So how do you know how and where to get all this data? We again have to look at the datasheet.

This table represents the contents of the eax register after the execution of the cpuid instruction with the function 0000_0001. We can see that the first four bits from the right represent the stepping - basically a version of a particular model. So how do we extract this number? By using bitwise operations. We can just use AND with a 0b1111 mask and get the first (from right) bits or more formally the four least significant bits. Then we just use the 0b1111 mask with AND and we get the value we want. After that we can shift the whole register value by four bits and continue with the process until we have extracted all the bits.
By the way, this is the output I get by running the code above on my system - the processor I am using is AMD Ryzen 7 3700X.
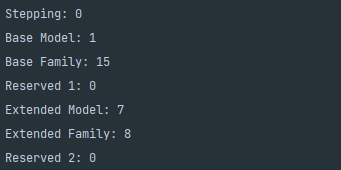
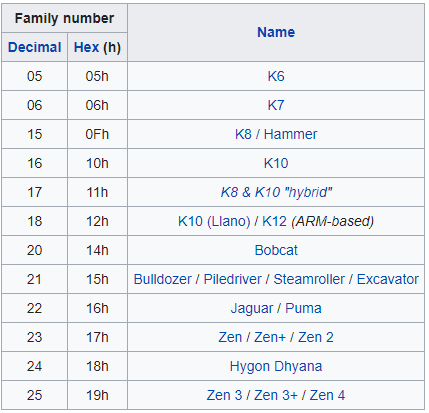
For example, according to the datasheet we can calculate that the family (number) of my CPU is 23 (base family + extended family) and we get the number 23. If we look at the AMD’s List of CPU microarchitectures, we can see that the CPU falls in the Zen / Zen+ / Zen 2 family, which Ryzen 7 3700X is a part of.
The model number also fits the hex value in the table (17h). Checking this website it seems that the stepping number is also correct.
Anyways, this is all for now. I will write more as I develop the application!